


Hive Developer Portal

Making a Decentralized Game on Hive
We will develop a decentralized game by the end of this series.
The following is a series written by @mahdiyari that describes how to develop a decentralized game on the Hive blockchain. It was originally released part by part, written over the course of about two months and originally posted on his blog.
Sections
Part 1
We will develop a decentralized game by the end of this series. The goal is to make learning development on Hive blockchain easier by using a simple game as the training project.
Target audience
Of course, it’s not for everybody. I will try to keep it simple as possible for people with less experience with development. But some degree of understanding code is necessary to learn something. I will explain anything related to the Hive blockchain that we use.
You can find the links for the final result of this part at the end of this post.
Why “tic-tac-toe”?
It’s a simple multiplayer game and it covers most of the topics needed for a bigger decentralized game or application. Most people are already familiar with this game and it’s easier to code and its rules are simple.
Development
We will use Javascript for the game because it’s simple enough so most people understand easily. The front-end will be pure HTML. Also, I think MySQL is a good fit as the database. The game needs a database to keep track of games and players. MySQL docker can be set up in a few minutes.
The decentralized game will work without depending on one central software. The game will talk only to the blockchain and there is no central database. It doesn’t need a private entity to hold players’ data. Anyone can run an interface for the game.
(We have a database but it’s not a central private database and it can be synced through blockchain. Anyone should be able to run an instance of the game and the game will get the same exact database by reading data from the blockchain. It’s like hivemind, the database that holds and serves most of the data on Hive.)
Tools I’m using
- Visual Studio Code
- Nodejs
- MySQL docker setup
- Chrome browser
I didn’t plan anything beforehand so I don’t know how many posts it will take. I will list the things that come to my mind right now.
Planning
- Front-end
- Make a login method on the client-side
- Display available games list
- Create/Request to join a game
- Design the game visuals and controls
- Back-end
- Stream the blockchain and listen for custom_json operations
- Define custom_json operations
- Game mechanics
- API to communicate with front-end
- Replay/resync method to update the database on newly deployed game clients
The above list may or may not change. Anyway, let’s start with the front-end and add a login method.
Part 1: Front-end - Login method
I think the HTML part doesn’t need any explanation. Page title, description, bootstrap navbar, and a login link. Added css/style.css and js/app.js too. When the user clicks on the “login” link, a modal with the login form will appear. It will then fire login() function on submit.
index.html:
<!DOCTYPE html>
<html lang="en">

<head>
  <meta charset="UTF-8" />
  <meta http-equiv="X-UA-Compatible" content="IE=edge" />
  <meta name="viewport" content="width=device-width, initial-scale=1.0" />
  <meta name="description" content="A decentralized game on hive blockchain" />
  <title>Tic-Tac-Toe on Hive blockchain</title>
  <link href="https://cdn.jsdelivr.net/npm/bootstrap@5.0.0-beta2/dist/css/bootstrap.min.css" rel="stylesheet"
    integrity="sha384-BmbxuPwQa2lc/FVzBcNJ7UAyJxM6wuqIj61tLrc4wSX0szH/Ev+nYRRuWlolflfl" crossorigin="anonymous" />
  <script src="https://cdn.jsdelivr.net/npm/bootstrap@5.0.0-beta2/dist/js/bootstrap.bundle.min.js"
    integrity="sha384-b5kHyXgcpbZJO/tY9Ul7kGkf1S0CWuKcCD38l8YkeH8z8QjE0GmW1gYU5S9FOnJ0"
    crossorigin="anonymous"></script>
  <script src="https://cdn.jsdelivr.net/npm/hive-tx/dist/hive-tx.min.js"></script>
  <link rel="stylesheet" href="css/style.css" />
</head>

<body>
  <nav class="navbar navbar-expand navbar-dark bg-dark">
    <div class="container-fluid">
      <a class="navbar-brand" href="#">Tic-Tac-Toe</a>
      <ul class="navbar-nav">
        <li class="nav-item">
          <a class="nav-link" href="#" data-bs-toggle="modal" data-bs-target="#login-modal" id="login-button">
            Login
          </a>
        <li class="nav-item dropdown" id="logout-menu" style="display: none;">
          <a class="nav-link dropdown-toggle" href="#" id="username-button" role="button" data-bs-toggle="dropdown"
            aria-expanded="false"></a>
          <ul class="dropdown-menu dropdown-menu-end" aria-labelledby="username-button">
            <li><a class="dropdown-item" href="#" onclick="logout()">Logout</a></li>
          </ul>
        </li>
        </li>
      </ul>
    </div>
  </nav>
  <div class="modal fade" id="login-modal" tabindex="-1" aria-labelledby="login-modal-title" aria-hidden="true">
    <div class="modal-dialog">
      <div class="modal-content">
        <div class="modal-header">
          <h5 class="modal-title" id="login-modal-title">Login</h5>
          <button type="button" class="btn-close" data-bs-dismiss="modal" aria-label="Close"></button>
        </div>
        <div class="modal-body">
          <form onsubmit="login(); return false">
            <div class="mb-3">
              <label for="username" class="form-label">Username:</label>
              <div class="input-group mb-3">
                <span class="input-group-text">@</span>
                <input type="text" class="form-control" placeholder="username" aria-label="username" id="username"
                  required>
              </div>
              <div class="form-text">Your Hive username. Lowercase.</div>
            </div>
            <div class="mb-3">
              <label for="posting-key" class="form-label">Posting key:</label>
              <input type="password" class="form-control" id="posting-key" placeholder="Private posting key" required>
              <div class="form-text">Your key will never leave your browser.</div>
            </div>
            <p id="login-error"></p>
            <button type="submit" class="btn btn-primary" id="login-form-btn">Login</button>
            <button type="button" class="btn btn-secondary" data-bs-dismiss="modal">Close</button>
          </form>
        </div>
      </div>
    </div>
  </div>
  <script src="js/app.js"></script>
</body>

</html>
Styles
css/style.css:
.navbar-nav {
  margin-right: 30px;
}
.navbar-brand {
  margin-left: 30px;
}
#login-error {
  color: #e31337;
  display: none;
}
Javascript
js/app.js
An object for user data.
const userData = {
  authorized: false,
  username: '',
  key: ''
}
Let’s define the login function. It will verify the posting key and username then keep the data in localStorage. We use the hive-tx library for converting keys.
const login = async () => {
  const loginModal = bootstrap.Modal.getInstance(
    document.getElementById('login-modal')
  )
  const loginButtonForm = document.getElementById('login-form-btn')
  loginButtonForm.setAttribute('disabled', 'true')
  const loginError = document.getElementById('login-error')
  loginError.style.display = 'none'
  const username = document.getElementById('username').value
  const key = document.getElementById('posting-key').value
  const validate = await validatePostingKey(username, key)
  if (validate.result === 0) {
    loginError.innerHTML = validate.error
    loginError.style.display = 'block'
    loginButtonForm.removeAttribute('disabled')
    return
  }
  userData.authorized = true
  userData.username = username
  userData.key = key
  window.localStorage.setItem('userData', JSON.stringify(userData))
  loginButtonForm.removeAttribute('disabled')
  updateState()
  loginModal.hide()
}
As you can see there are 2 more functions used inside the login function. The first one is validatePostingKey(). It’s a post for itself.
Let me explain it. First, we make a call to the Hive RPC API node by using hive-tx library and get the account information including the public posting key. Then we convert the user’s private posting key to the public key and compare the two values. If the two values are equal then the user-provided private key is correct and we can authorize the user. There are also other ways to achieve the same result like signing a message with the private key and validating that signature with the public key.
const validatePostingKey = async (username, privateKey) => {
  const accounts = await hiveTx.call('condenser_api.get_accounts', [[username]])
  if (
    !accounts ||
    !accounts.result ||
    !Array.isArray(accounts.result) ||
    accounts.result.length < 1
  ) {
    return { result: 0, error: 'Network error or wrong username' }
  }
  try {
    const account = accounts.result[0]
    const publicWif = account.posting.key_auths[0][0] || ''
    const generatedPublicKey = hiveTx.PrivateKey.from(privateKey)
      .createPublic()
      .toString()

    if (generatedPublicKey !== publicWif) {
      return { result: 0, error: 'Wrong key' }
    }
    return { result: 1 }
  } catch (e) {
    return { result: 0, error: 'Wrong key or network error' }
  }
}
updateState() is used to update the HTML interface after user login and logout.
const updateState = () => {
  const loginButton = document.getElementById('login-button')
  const logoutMenu = document.getElementById('logout-menu')
  const usernameButton = document.getElementById('username-button')
  if (userData.authorized && userData.username && userData.key) {
    loginButton.style.display = 'none'
    logoutMenu.style.display = 'block'
    usernameButton.innerHTML = '@' + userData.username
  } else {
    loginButton.style.display = 'block'
    logoutMenu.style.display = 'none'
  }
}
And it’s time for the logout function.
const logout = () => {
  userData.authorized = false
  userData.username = ''
  userData.key = ''
  window.localStorage.removeItem('userData')
  updateState()
}
We need to check localStorage on the page reload and log in the user if the key is in the localStorage.
const checkState = () => {
  const localData = window.localStorage.getItem('userData')
  let data
  if (!localData) {
    return
  }
  try {
    data = JSON.parse(localData)
  } catch (e) {
    data = userData
  }
  if (data.authorized && data.username && data.key) {
    userData.authorized = true
    userData.username = data.username
    userData.key = data.key
    updateState()
  }
}
checkState()
Now we have a working login and logout system. It keeps user data in localStorage which stays on the browser only. What we have done so far is just the front-end. Our game needs a back-end server to provide the game data. We will stream blocks on the back-end and process game data then serve it through API. Our front-end will broadcast transactions which will update the back-end. In other words, the back-end is only serving the data it receives through the blockchain. We could stream the blocks on the client-side (browser) but it’s not efficient and it is just unnecessary bandwidth waste.
You can see the running app on https://tic-tac-toe.mahdiyari.info/ The final code is on GitLab https://gitlab.com/mahdiyari/decentralized-game-on-hive
In the next part, we will set up our back-end server and database. Now that I think about it, MySQL might be an overkill for this project. Anyway, let’s stick to it for now.
Part 2
In this part, we work on the back-end of the game. We use Nodejs for running our back-end codes. I assume you know how to create or run a Nodejs app. It’s not complicated and I will cover most of it here.
API server
api/server.js is the starting point of the API server. Let’s initialize it with expressjs and some libraries for API usage.
const express = require('express')
const bodyParser = require('body-parser')
const hpp = require('hpp')
const helmet = require('helmet')
const app = express()

// more info: www.npmjs.com/package/hpp
app.use(hpp())
app.use(helmet())

// support json encoded bodies and encoded bodies
app.use(bodyParser.json())
app.use(bodyParser.urlencoded({ extended: true }))

app.use(function (req, res, next) {
  const allowedOrigins = [
    'http://localhost',
    'https://tic-tac-toe.mahdiyari.info/'
  ]
  const origin = req.headers.origin
  if (allowedOrigins.includes(origin)) {
    res.header('Access-Control-Allow-Origin', origin)
  }
  res.header('Access-Control-Allow-Credentials', true)
  res.header(
    'Access-Control-Allow-Headers',
    'Origin, X-Requested-With, Content-Type, Accept, access_key'
  )
  next()
})
Note: multiple values are not allowed in the Access-Control-Allow-Origin header.
Don’t forget to install npm packages.
npm install express
npm install body-parser
npm install hpp
npm install helmet
hpp and helmet are for increased security and body-parser for parsing request bodies for json encoded bodies and encoded bodies.
I also added http://localhost and https://tic-tac-toe.mahdiyari.info/ to the Access-Control-Allow-Origin header. You can add another URL to receive API calls from or just put *. It basically limits the usage of the API server to the listed URLs.
Our API server will listen to 127.0.0.1:2021 by default. It does nothing at the moment. Let’s continue with the main application.
Main application
We will run 2 Nodejs apps. One is the API server and the other is the main application where streaming blocks and processing data is happening. The reason for splitting applications is to run the API server in cluster mode. With cluster mode, we can run one API server for each CPU core. It will help with load balancing and keep API running as fast as possible while serving many requests. The cluster mode is useful only on API servers and especially Expressjs apps.
We will need a helper to stream the blocks.
helpers/streamBlock.js:
const hiveTx = require('hive-tx')

const INTERVAL_TIME = 1000

const streamBlockNumber = async (cb) => {
  try {
    let lastBlock = 0
    setInterval(async () => {
      const gdgp = await hiveTx.call(
        'condenser_api.get_dynamic_global_properties'
      )
      if (
        gdgp &&
        gdgp.result &&
        gdgp.result.head_block_number &&
        !isNaN(gdgp.result.head_block_number)
      ) {
        if (gdgp.result.head_block_number > lastBlock) {
          lastBlock = gdgp.result.head_block_number
          cb(lastBlock)
        }
      }
    }, INTERVAL_TIME)
  } catch (e) {
    throw new Error(e)
  }
}

const streamBlockOperations = async (cb) => {
  try {
    streamBlockNumber(async (blockNumber) => {
      const result = await hiveTx.call('condenser_api.get_block', [
        blockNumber
      ])
      if (result.result) {
        const operations = result.result.transactions.map((transaction) => {
          return transaction.operations
        })
        if (operations.length > 0) {
          for (const operation of operations) {
            cb(operation)
          }
        }
      }
    })
  } catch (e) {
    throw new Error(e)
  }
}

module.exports = {
  streamBlockNumber,
  streamBlockOperations
}
install hive-tx: npm install hive-tx
We created 2 functions here. The first one streamBlockNumber makes a call to get dynamic_global_properties every INTERVAL_TIME which I set to 1000ms (1 second) then checks for newly produced block number. If the block number is increased, then it calls the callback function with the new block number. It’s a helpful function for getting newly generated block numbers.
We use the first function inside the second function streamBlockOperations to get newly generated blocks and get operations inside that block by using the condenser_api.get_block method.
streamBlockOperations will call the callback function with newly added operations to the blockchain (except virtual operations).
index.js:
const stream = require('./helpers/streamBlock')

try {
  stream.streamBlockOperations((ops) => {
    if (ops) {
      const op = ops[0]
      if (op && op[0] === 'custom_json' && op[1].id === 'tictactoe') {
        processData(op[1].json)
      }
    }
  })
} catch (e) {
  throw new Error(e)
}
This will stream newly added operations to the blockchain and send the JSON from custom_json operations with the id of tictactoe to the processData function.
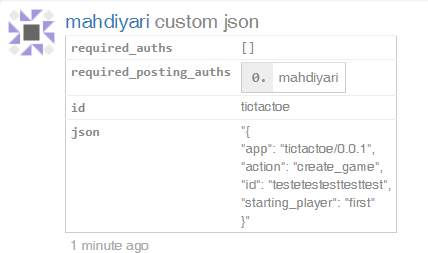
We should define game mechanics and their corresponding custom_json.
Create a game
{
  app: 'tictactoe/0.0.1'
  action: 'create_game',
  id: 'Random generated id',
  starting_player: 'first or second'
}
Create a game and wait for the other player to join.
Request join a game
{
  app: 'tictactoe/0.0.1',
  action: 'request_join',
  id: 'Game id'
}
Request to join an open game which is created by someone else.
Accept join request
{
  app: 'tictactoe/0.0.1',
  action: 'accept_request',
  id: 'Game id',
  player: 'username'
}
Accept the pending join request from another player to your created game.
Play
{
  app: 'tictactoe/0.0.1',
  action: 'play',
  id: 'Game id',
  col: '1 to 3',
  row: '1 to 3'
}
Play or place an X/O on the board. col is the column and row is for the row of the placed X/O on the board.

Code implamantaion of the above in index.js:
const processData = (jsonData) => {
  try {
    if (!jsonData) {
      return
    }
    const data = JSON.parse(jsonData)
    if (!data || !data.action || !data.app) {
      return
    }
    if (data.action === 'create_game') {
      createGame(data)
    } else if (data.action === 'request_join') {
      requestJoin(data)
    } else if (data.action === 'accept_request') {
      acceptRequest(data)
    } else if (data.action === 'play') {
      play(data)
    }
  } catch (e) {
    // error might be on JSON.parse and wrong json format
    return null
  }
}
Let’s create a function for each game mechanic.
createGame:
const createGame = (data) => {
  if (!data || !data.id || !data.starting_player) {
    return
  }
  // validating
  if (
    data.id.length !== 20 ||
    (data.starting_player !== 'first' && data.starting_player !== 'second')
  ) {
    return
  }
  // Add game to database
  console.log('Create a game with id ' + data.id)
}
requestJoin:
const requestJoin = (data) => {
  if (!data || !data.id || !data.id.length !== 20) {
    return
  }
  // Check game id in database
  // Join game
  console.log('A player joined game id ' + data.id)
}
acceptRequest:
const acceptRequest = (data) => {
  if (!data || !data.id || !data.player || !data.id.length !== 20) {
    return
  }
  // Validate game in database
  // Accept the join request
  console.log('Accepted join request game id ' + data.id)
}
play:
const play = (data) => {
  if (
    !data ||
    !data.id ||
    !data.col ||
    !data.row ||
    !data.id.length !== 20 ||
    data.col < 1 ||
    data.col > 3 ||
    data.row < 1 ||
    data.row > 3
  ) {
    return
  }
  // Validate game in database
  // Validate the player round
  // Play game
  console.log('Played game id ' + data.id)
}
The above functions are not doing anything at the moment. We will complete those functions after setting up the database in the next part.
We can test our code by broadcasting custom_json operations. Let’s see if the streaming method and processing data works.
We can run the app by node index.js
https://hiveblocks.com/tx/44799e6a27c64e935f9072ecb576602330cb80b8
And here is the console.log() confirmation in our app:

Part 3
MySQL Setup
You can use apps like AMPPS which comes with MySQL and other tools like PHPMyAdmin (one of the best MySQL management apps) or install MySQL directly. I have AMMPS on windows and use MySQL docker on Linux.
MySQL docker installation:
docker pull mysql/mysql-server:latest
I create a folder /root/mysql-docker1 and put the MySQL config file there my.cnf and another folder data for holding the database files.
Running on port 127.0.0.1:3306:
docker run --name=mysql1 \
--mount type=bind,src=/root/mysql-docker1/my.cnf,dst=/etc/my.cnf \
--mount type=bind,src=/root/mysql-docker1/data,dst=/var/lib/mysql \
-p 127.0.0.1:3306:3306 -d mysql/mysql-server:latest
There are different ways to tune your MySQL server based on your hardware which I’m not going to talk about. The following config is for medium-range hardware (32GB ram).
my.cnf:
[mysqld]
skip_name_resolve
user=mysql
default_authentication_plugin = mysql_native_password

symbolic-links=0
character_set_server=utf8mb4
collation_server=utf8mb4_general_ci
innodb_max_dirty_pages_pct = 90
innodb_max_dirty_pages_pct_lwm = 10
innodb_flush_neighbors = 0
innodb_undo_log_truncate=off
max_connect_errors = 1000000

# InnoDB Settings
innodb_file_per_table
innodb_log_files_in_group       = 2
innodb_open_files               = 4000
default_storage_engine          = InnoDB
innodb_buffer_pool_instances    = 8     # Use 1 instance per 1GB of InnoDB pool size
innodb_buffer_pool_size         = 16G    # Use up to 70-80% of RAM
innodb_flush_method             = O_DIRECT_NO_FSYNC
innodb_log_buffer_size          = 64M
innodb_log_file_size            = 10G
innodb_stats_on_metadata        = 0

# tune
innodb_doublewrite= 1
innodb_thread_concurrency       = 0
innodb_flush_log_at_trx_commit  = 0
innodb_lru_scan_depth           = 2048
innodb_page_cleaners            = 4
join_buffer_size                = 256K
sort_buffer_size                = 256K
innodb_use_native_aio           = 1
innodb_stats_persistent         = 1

innodb_adaptive_flushing        = 1
innodb_read_io_threads          = 16
innodb_write_io_threads         = 16
innodb_io_capacity              = 1500
innodb_io_capacity_max          = 2500
innodb_purge_threads            = 4
innodb_adaptive_hash_index      = 0
max_prepared_stmt_count         = 1000000
innodb_monitor_enable           = '%'
performance_schema              = ON
key_buffer_size = 512M
# Connection Settings
max_connections                 = 2000   # UPD
back_log                        = 3000
interactive_timeout             = 180
wait_timeout                    = 10
table_open_cache                = 200000 # UPD
table_open_cache_instances      = 64
open_files_limit                = 100000 # UPD
Note: restart MySQL server after updating themy.cnf file.
MySQL password on AMMPS is mysql and on docker setup, I think you get the password from docker logs mysql1. Anyway, there are many documentations about MySQL already on the internet.
Create a database tictactoe. It’s easier with tools like PHPMyAdmin if you are using AMPPS. Or try HeidiSQL.
Here is the SQL command for creating the database:
CREATE DATABASE `tictactoe`;
Development
Let’s create a config file for holding MySQL login information for our app. I will put this file as config.example.js in repository and you have to rename it manually.
config.js:
const config = {
  dbName: 'tictactoe',
  dbUser: 'root',
  dbPassword: 'password',
  dbHost: '127.0.0.1',
  dbPort: 3306
}

module.exports = config
I have a personal code for MySQL connection pooling. It simply makes a custom async function just like the original connect function of mysqljs library but for pooling connections.
helpers/mysql.js:
const mysql = require('mysql')
const config = require('../config')
const pool = mysql.createPool({
  connectionLimit: 5,
  host: config.dbHost,
  port: config.dbPort,
  user: config.dbUser,
  password: config.dbPassword,
  database: config.dbName,
  charset: 'utf8mb4'
})

// Rewriting MySQL query method as a promise
const con = {}
con.query = async (query, val) => {
  if (val) {
    const qu = await new Promise((resolve, reject) => {
      pool.query(query, val, (error, results) => {
        if (error) reject(new Error(error))
        resolve(results)
      })
    })
    return qu
  } else {
    const qu = await new Promise((resolve, reject) => {
      pool.query(query, (error, results) => {
        if (error) reject(new Error(error))
        resolve(results)
      })
    })
    return qu
  }
}

module.exports = con
It creates a pool of 5 connections which is more than enough for our game.
And of course:
npm install mysql
Initializing database
We make a function to create necessary tables if they don’t exist already.
helpers/initDatabase.js:
const mysql = require('./mysql')
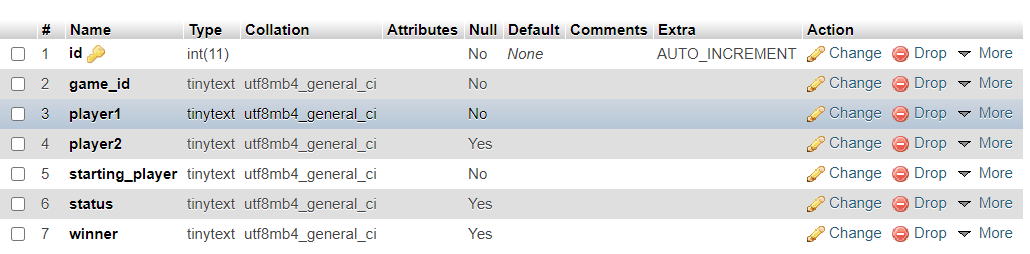
/**
* id, game_id, player1, player2, starting_player, status, winner
*/
const tableGames =
'CREATE TABLE IF NOT EXISTS `tictactoe`.`games` ( `id` INT NOT NULL AUTO_INCREMENT , ' +
'`game_id` TINYTEXT NOT NULL , ' +
'`player1` TINYTEXT NOT NULL , `player2` TINYTEXT NULL DEFAULT NULL , ' +
'`starting_player` TINYTEXT NOT NULL , `status` TINYTEXT NULL , ' +
'`winner` TINYTEXT NULL DEFAULT NULL , PRIMARY KEY (`id`)) ' +
'ENGINE = InnoDB CHARSET=utf8mb4 COLLATE utf8mb4_general_ci;'
/**
* id, game_id, player, col, row
*/
const tableMoves =
'CREATE TABLE IF NOT EXISTS `tictactoe`.`moves` ( `id` INT NOT NULL AUTO_INCREMENT , ' +
'`game_id` TINYTEXT NOT NULL , `player` TINYTEXT NOT NULL , ' +
'`col` INT(1) NOT NULL , `row` INT(1) NOT NULL , ' +
'PRIMARY KEY (`id`)) ENGINE = InnoDB CHARSET=utf8mb4 COLLATE utf8mb4_general_ci;'
const tableRquests =
'CREATE TABLE IF NOT EXISTS `tictactoe`.`requests` ( `id` INT NOT NULL AUTO_INCREMENT , ' +
'`game_id` TINYTEXT NOT NULL , `player` TINYTEXT NOT NULL , `status` TINYTEXT NOT NULL , ' +
'PRIMARY KEY (`id`)) ENGINE = InnoDB CHARSET=utf8mb4 COLLATE utf8mb4_general_ci;'
const initDatabase = async () => {
await mysql.query(tableGames)
await mysql.query(tableMoves)
await mysql.query(tableRquests)
}
module.exports = initDatabase
Created tables
games
moves

requests

Updating main application
Now we can complete the game methods in index.js:
createGame
const createGame = async (data, user) => {
  if (!data || !data.id || !data.starting_player) {
    return
  }
  // validating
  if (
    data.id.length !== 20 ||
    (data.starting_player !== 'first' && data.starting_player !== 'second')
  ) {
    return
  }
  // Check already existing games
  const duplicate = await mysql.query(
    'SELECT `id` FROM `games` WHERE `game_id`= ?',
    [data.id]
  )
  if (duplicate && Array.isArray(duplicate) && duplicate.length > 0) {
    return
  }
  // Add game to database
  await mysql.query(
    'INSERT INTO `games`(`game_id`, `player1`, `starting_player`, `status`) VALUES (?, ?, ?, ?)',
    [data.id, user, data.starting_player, 'waiting']
  )
}
requestJoin
const requestJoin = async (data, user) => {
  if (!data || !data.id || !data.id.length !== 20) {
    return
  }
  // Check game id in database
  const game = await mysql.query(
    'SELECT `player1` FROM `games` WHERE `game_id`= ? AND `status`= ?',
    [data.id, 'waiting']
  )
  if (!game || !Array.isArray(game) || game.length < 1) {
    return
  }
  // Players can not play with themselves
  if (game[0].player1 === user) {
    return
  }
  // Check already open requests
  const requests = await mysql.query(
    'SELECT `id` FROM `requests` WHERE `game_id`= ? AND (`player`= ? OR `status`= ?)',
    [data.id, user, 'accepted']
  )
  if (requests && Array.isArray(requests) && requests.length > 0) {
    return
  }
  // Request join game
  await mysql.query(
    'INSERT INTO `requests`(`game_id`, `player`, `status`) VALUES (?, ?, ?)',
    [data.id, user, 'waiting']
  )
}
acceptRequest
const acceptRequest = async (data, user) => {
  if (!data || !data.id || !data.player || !data.id.length !== 20) {
    return
  }
  // Validate game in database
  const game = await mysql.query(
    'SELECT `player1` FROM `games` WHERE `game_id`= ? AND `status`= ?',
    [data.id, 'waiting']
  )
  if (!game || !Array.isArray(game) || game.length < 1) {
    return
  }
  const requests = await mysql.query(
    'SELECT `id` FROM `requests` WHERE `game_id`= ? AND `player`= ? AND `status`= ?',
    [data.id, data.player, 'waiting']
  )
  if (!requests || !Array.isArray(requests) || requests.length < 1) {
    return
  }
  // Accept the join request and update game status
  await mysql.query(
    'UPDATE `games` SET `player2`=?,`status`=? WHERE `game_id`=?',
    [data.player, 'running', data.id]
  )
  await mysql.query(
    'UPDATE `requests` SET `status`=? WHERE `game_id`=? AND `player`=?',
    ['accepted', data.id, data.player]
  )
}
Some updates to processData:
const processData = (jsonData, postingAuths) => {
  try {
    if (!jsonData) {
      return
    }
    const data = JSON.parse(jsonData)
    if (!data || !data.action || !data.app) {
      return
    }
    if (
      !postingAuths ||
      !Array.isArray(postingAuths) ||
      postingAuths.length < 1
    ) {
      return
    }
    const user = postingAuths[0]
    if (data.action === 'create_game') {
      createGame(data, user)
    } else if (data.action === 'request_join') {
      requestJoin(data, user)
    } else if (data.action === 'accept_request') {
      acceptRequest(data, user)
    } else if (data.action === 'play') {
      play(data, user)
    }
  } catch (e) {
    // error might be on JSON.parse and wrong json format
    return null
  }
}
And streaming function:
try {
  stream.streamBlockOperations((ops) => {
    if (ops) {
      const op = ops[0]
      if (op && op[0] === 'custom_json' && op[1].id === 'tictactoe') {
        processData(op[1].json, op[1].required_posting_auths)
      }
    }
  })
} catch (e) {
  throw new Error(e)
}
I think it’s enough for this part. Let’s finish before I sleep on the keyboard.
We set up the MySQL server and made a script to create 3 tables. Our back-end is now processing data into the database and 3 main functions are working as expected. Creating a game, Requesting to join a game, and accepting the requests.
We have to create the front-end for these functions in the next part. I think the hard part is going to be the play function which holds the game rules.
Part 4
API
Let’s start by implementing the API for retrieving the games list. Our API is public so it doesn’t require user authentication. The API will just return the data synced from the blockchain.
api/games.js:
const mysql = require('../helpers/mysql')
const express = require('express')
const router = express.Router()

// Return all games on route /games
router.get('/games', async (req, res) => {
  try {
    // Get games data from Database
    const games = await mysql.query(
      'SELECT `game_id`, `player1`, `player2`, `starting_player`, `status`, `winner` FROM `games`'
    )
    // Check for expected result
    if (!games || !Array.isArray(games) || games.length < 1) {
      // WE return id: 1 for success and id: 0 for errors
      return res.json({
        id: 1,
        games: []
      })
    }
    // We return `games` as we receive from MySQL but it's not a good practice
    // specially when you have critical data in the database
    // You can return data one by one like `games: [{game_id: games.game_id, ...}]`
    return res.json({
      id: 1,
      games
    })
  } catch (e) {
    // Return error for unexpected errors like connection drops
    res.json({
      id: 0,
      error: 'Unexpected error.'
    })
  }
})

module.exports = router
The comments are in the code itself for better understanding.
Note: We use try{} catch{} wherever we can. It is always good to handle errors.
We can test our API at this point to detect possible errors in the code.
Include the following code in api/server.js just above the port and host constants.
const games = require('./games')
app.use(games)
Run node api/server.js. We can see the console.log: Application started on 127.0.0.1:2021
Let’s open 127.0.0.1:2021/games in the browser.

The API works as expected.
But it’s not done yet. This API returns ALL the games without a specific order. We should implement pagination and define an order for our list.
Updated code api/games.js:
const mysql = require('../helpers/mysql')
const express = require('express')
const router = express.Router()

router.get('/games/:page', async (req, res) => {
  try {
    if (isNaN(req.params.page)) {
      res.json({
        id: 0,
        error: 'Expected number.'
      })
    }
    const page = Math.floor(req.params.page)
    if (page < 1) {
      res.json({
        id: 0,
        error: 'Expected > 0'
      })
    }
    const offset = (page - 1) * 10
    const games = await mysql.query(
      'SELECT `game_id`, `player1`, `player2`, `starting_player`, `status`, `winner` FROM `games`' +
        ' ORDER BY `id` DESC LIMIT 10 OFFSET ?',
      [offset]
    )
    if (!games || !Array.isArray(games) || games.length < 1) {
      return res.json({
        id: 1,
        games: []
      })
    }
    return res.json({
      id: 1,
      games
    })
  } catch (e) {
    res.json({
      id: 0,
      error: 'Unexpected error.'
    })
  }
})

module.exports = router
We used id to order our list and get the newly created games first. Each page returns up to 10 games. We can try 127.0.0.1:2021/games/1 for testing.
Let’s set another API for requests. The code is almost similar but we return only requests for the specific game_id.
api/requests.js:
const mysql = require('../helpers/mysql')
const express = require('express')
const router = express.Router()

router.get('/requests/:id', async (req, res) => {
  try {
    if (!req.params.id) {
      res.json({
        id: 0,
        error: 'Expected game_id.'
      })
    }
    // We are passing user input into the database
    // You should be careful in such cases
    // We use ? for parameters which escapes the characters
    const requests = await mysql.query(
      'SELECT `player`, `status` FROM `requests` WHERE `game_id`= ?',
      [req.params.id]
    )
    if (!requests || !Array.isArray(requests) || requests.length < 1) {
      return res.json({
        id: 1,
        requests: []
      })
    }
    return res.json({
      id: 1,
      requests
    })
  } catch (e) {
    res.json({
      id: 0,
      error: 'Unexpected error.'
    })
  }
})

module.exports = router
Note: :id in the above router represents a variable named id. So for example http://127.0.0.1:2021/requests/mygameidhere in this request, the id variable is mygameidhere which is accessible by req.params.id.
A similar code for the moves table. There wasn’t a better name in my mind for this table.
api/moves.js:
const mysql = require('../helpers/mysql')
const express = require('express')
const router = express.Router()

router.get('/moves/:id', async (req, res) => {
  try {
    if (!req.params.id) {
      res.json({
        id: 0,
        error: 'Expected game_id.'
      })
    }
    const moves = await mysql.query(
      'SELECT `player`, `col`, `row` FROM `moves` WHERE `game_id`= ?',
      [req.params.id]
    )
    if (!moves || !Array.isArray(moves) || moves.length < 1) {
      return res.json({
        id: 1,
        moves: []
      })
    }
    return res.json({
      id: 1,
      moves
    })
  } catch (e) {
    res.json({
      id: 0,
      error: 'Unexpected error.'
    })
  }
})

module.exports = router
Now our 3 APIs are ready to be implemented on the front-end.
Here is the updated api/server.js after including the APIs:
const express = require('express')
const bodyParser = require('body-parser')
const hpp = require('hpp')
const helmet = require('helmet')
const app = express()

// more info: www.npmjs.com/package/hpp
app.use(hpp())
app.use(helmet())

// support json encoded bodies and encoded bodies
app.use(bodyParser.json())
app.use(bodyParser.urlencoded({ extended: true }))

app.use(function (req, res, next) {
  res.header(
    'Access-Control-Allow-Origin',
    'http://localhost https://tic-tac-toe.mahdiyari.info/'
  )
  res.header('Access-Control-Allow-Credentials', true)
  res.header(
    'Access-Control-Allow-Headers',
    'Origin, X-Requested-With, Content-Type, Accept, access_key'
  )
  next()
})

// APIs
const games = require('./games')
const requests = require('./requests')
const moves = require('./moves')

app.use(games)
app.use(requests)
app.use(moves)

const port = process.env.PORT || 2021
const host = process.env.HOST || '127.0.0.1'
app.listen(port, host, () => {
  console.log(`Application started on ${host}:${port}`)
})
Front-end
I think using pure HTML is a mistake and I would prefer something like Angular for the web applications but that comes with its own learning process which can make this tutorial complex. So my recommendation is to learn something like Angular or Vue and live a happy life. Anyway, coding time.
I’m not going to drop index.html here. It doesn’t need much explanation and it’s long. You can see it on the GitLab repository. I will just add some references here used in app.js.
The table for listing the games and buttons for pagination.
index.html:
<div class="card-body">
<h5 class="card-title" style="float: left;">Games list</h5>
<span style="float: right;">Auto updating every 5s</span>
<table class="table table-striped">
<thead>
<tr>
<th>#</th>
<th>Game ID</th>
<th>Player 1</th>
<th>Player 2</th>
<th>Starting Player</th>
<th>Status</th>
<th>Winner</th>
<th>Action</th>
</tr>
</thead>
<tbody id="games-table-body">
</tbody>
</table>
<nav aria-label="Page navigation example">
<ul class="pagination justify-content-center">
<li class="page-item disabled" id="prev-btn">
<a class="page-link" onclick="prevGamesPage()">«</a>
</li>
<li class="page-item disabled">
<a class="page-link" id="page-number" tabindex="-1"> 1 </a>
</li>
<li class="page-item" id="next-btn">
<a class="page-link" onclick="nextGamesPage()">»</a>
</li>
</ul>
</nav>
</div>
We have to fill the table above. So let’s implement some basic functions.
js/app.js:
const baseAPI = 'http://127.0.0.1:2021'
const APICall = async (api) => {
  return (await fetch(baseAPI + api)).json()
}
For ease of use, we define a function for GET calls using fetch and a variable for our API address.
const getGames = async (page = 1) => {
  const games = await APICall('/games/' + page)
  return games.games
}
This function basically gets the games from the API per page.
const fillGamesTable = (data) => {
  const tbody = document.getElementById('games-table-body')
  let temp = ''
  for (let i = 0; i < data.length; i++) {
    temp += `<tr>
    <td>${(gamesPage - 1) * 10 + i + 1}</td>
    <td>${data[i].game_id}</td>
    <td>${data[i].player1}</td>
    <td>${data[i].player2}</td>
    <td>${data[i].starting_player}</td>
    <td>${data[i].status}</td>
    <td>${data[i].winner}</td>
    <td></td>
    </tr>`
  }
  if (data.length < 1) {
    temp = 'No games.'
  }
  tbody.innerHTML = temp
}
fillGamesTable takes the result from getGames function and fills the HTML table with data using a for loop.
let gamesPage = 1
const loadTheGames = async () => {
  const games = await getGames(gamesPage)
  fillGamesTable(games)
  if (games.length < 10) {
    document.getElementById('next-btn').className = 'page-item disabled'
  } else {
    document.getElementById('next-btn').className = 'page-item'
  }
  if (gamesPage === 1) {
    document.getElementById('prev-btn').className = 'page-item disabled'
  } else {
    document.getElementById('prev-btn').className = 'page-item'
  }
  document.getElementById('page-number').innerHTML = ` ${gamesPage} `
}
loadTheGames()
setInterval(() => loadTheGames(), 5000)
With this function, we call the two previously defined functions to do their job and update the pagination buttons and the page number every time we update the table data. Also, every 5 seconds, it gets new data from API and updates the table with new data so users don’t have to reload the page for new data.
const nextGamesPage = () => {
  gamesPage++
  loadTheGames()
}

const prevGamesPage = () => {
  gamesPage--
  loadTheGames()
}
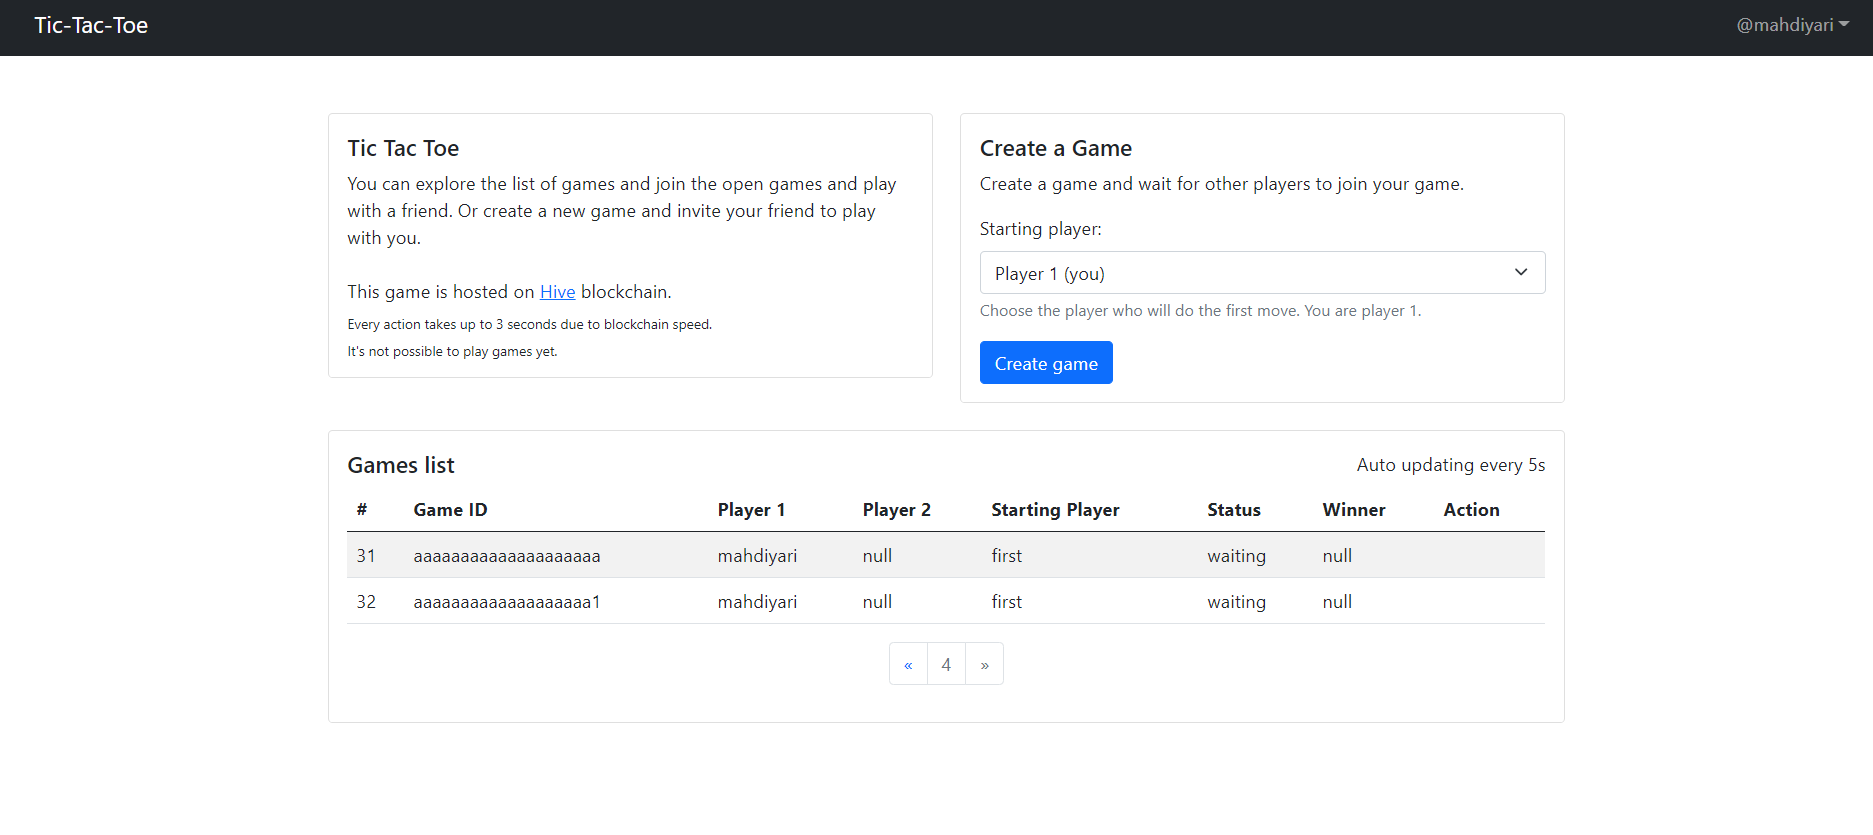
And two functions for changing pages. Simple as that.
The final result with dummy data looks like this on the browser:
Part 5
Games are fun and most people like to play different kinds of games. I’m not sure about the game we are building. Whether it be fun or not, the purpose of this project is the tutorial. To have a step-by-step guide that developers can use as a reference in building apps on Hive.
Building the transactions
We will build the back-end for the front-end that we built in the previous post. All goes into js/app.js.
const random = (length = 20) => {
  const chars = 'ABCDEFGHIJKLMNOPQRSTUVWXYZabcdefghijklmnopqrstuvwxyz0123456789'
  let str = ''
  for (let i = 0; i < length; i++) {
    str += chars.charAt(Math.floor(Math.random() * chars.length))
  }
  return str
}
A simple function to generate a random string. We will use the random string for the game_id.
const createGame = async () => {
  const button = document.getElementById('create-game-btn')
  button.setAttribute('disabled', 'true')
  const errorOutput = document.getElementById('create-game-error')
  const successOutput = document.getElementById('create-game-success')
  errorOutput.innerHTML = ''
  successOutput.innerHTML = ''
  try {
    const game = {
      app: 'tictactoe/0.0.1',
      action: 'create_game',
      id: random(20),
      starting_player: document.getElementById('starting-player').value
    }
    const operations = [
      [
        'custom_json',
        {
          required_auths: [],
          required_posting_auths: [userData.username],
          id: 'tictactoe',
          json: JSON.stringify(game)
        }
      ]
    ]
    const tx = new hiveTx.Transaction()
    await tx.create(operations)
    const privateKey = hiveTx.PrivateKey.from(userData.key)
    tx.sign(privateKey)
    const result = await tx.broadcast()
    if (result && result.result && result.result.block_num) {
      successOutput.innerHTML =
        'Success! <a href="link to game">Click to see</a>'
    } else {
      errorOutput.innerHTML =
        'Error! Check console for details. Press Ctrl+Shift+J'
      console.error(result)
    }
  } catch (e) {
    errorOutput.innerHTML =
      'Error! Check console for details. Press Ctrl+Shift+J'
    console.error(e)
  }
  button.removeAttribute('disabled')
}
We create the transaction by using the hive-tx library then sign and broadcast it. We put the game link in the success message and show it to the user.
Now users can create the game and see the list of games. We create the game.html page for users to play the game.
Game page
We can add the game board, moves history, and the game stats like the winner, player1, and player2. I think we can make this page accessible by the game_id, like /game.html?id=game_id_here. Let’s create the easier parts first.
game.html: We use the head from index.html and the same navbar code.
<!DOCTYPE html>
<html lang="en">

<head>
  <meta charset="UTF-8">
  <meta http-equiv="X-UA-Compatible" content="IE=edge">
  <meta name="viewport" content="width=device-width, initial-scale=1.0">
  <meta name="description" content="A decentralized game on hive blockchain" />
  <title>Tic-Tac-Toe on Hive blockchain</title>
  <link href="https://cdn.jsdelivr.net/npm/bootstrap@5.0.0-beta2/dist/css/bootstrap.min.css" rel="stylesheet"
    integrity="sha384-BmbxuPwQa2lc/FVzBcNJ7UAyJxM6wuqIj61tLrc4wSX0szH/Ev+nYRRuWlolflfl" crossorigin="anonymous" />
  <script src="https://cdn.jsdelivr.net/npm/bootstrap@5.0.0-beta2/dist/js/bootstrap.bundle.min.js"
    integrity="sha384-b5kHyXgcpbZJO/tY9Ul7kGkf1S0CWuKcCD38l8YkeH8z8QjE0GmW1gYU5S9FOnJ0"
    crossorigin="anonymous"></script>
  <script src="https://cdn.jsdelivr.net/npm/hive-tx/dist/hive-tx.min.js"></script>
  <link rel="stylesheet" href="css/style.css" />
</head>

<body>
  <nav class="navbar navbar-expand navbar-dark bg-dark">
    <div class="container-fluid">
      <a class="navbar-brand" href="#">Tic-Tac-Toe</a>
      <ul class="navbar-nav">
        <li class="nav-item">
          <a class="nav-link" href="#" data-bs-toggle="modal" data-bs-target="#login-modal" id="login-button">
            Login
          </a>
        <li class="nav-item dropdown" id="logout-menu" style="display: none;">
          <a class="nav-link dropdown-toggle" href="#" id="username-button" role="button" data-bs-toggle="dropdown"
            aria-expanded="false"></a>
          <ul class="dropdown-menu dropdown-menu-end" aria-labelledby="username-button">
            <li><a class="dropdown-item" href="#" onclick="logout()">Logout</a></li>
          </ul>
        </li>
        </li>
      </ul>
    </div>
  </nav>
  <!-- Login Modal -->
  <div class="modal fade" id="login-modal" tabindex="-1" aria-labelledby="login-modal-title" aria-hidden="true">
    <div class="modal-dialog">
      <div class="modal-content">
        <div class="modal-header">
          <h5 class="modal-title" id="login-modal-title">Login</h5>
          <button type="button" class="btn-close" data-bs-dismiss="modal" aria-label="Close"></button>
        </div>
        <div class="modal-body">
          <form onsubmit="login(); return false">
            <div class="mb-3">
              <label for="username" class="form-label">Username:</label>
              <div class="input-group mb-3">
                <span class="input-group-text">@</span>
                <input type="text" class="form-control" placeholder="username" aria-label="username" id="username"
                  required>
              </div>
              <div class="form-text">Your Hive username. Lowercase.</div>
            </div>
            <div class="mb-3">
              <label for="posting-key" class="form-label">Posting key:</label>
              <input type="password" class="form-control" id="posting-key" placeholder="Private posting key" required>
              <div class="form-text">Your key will never leave your browser.</div>
            </div>
            <p id="login-error"></p>
            <button type="submit" class="btn btn-primary" id="login-form-btn">Login</button>
            <button type="button" class="btn btn-secondary" data-bs-dismiss="modal">Close</button>
          </form>
        </div>
      </div>
    </div>
  </div>
  <!-- Modal end -->

  <script src="js/app.js"></script>
</body>

</html>
Since we use app.js here too, we have to modify 2 lines in app.js:
// Run the script only in homepage
if (!window.location.pathname.match(/game.html$/)) {
  loadTheGames()
  setInterval(() => loadTheGames(), 5000)
}
In the above code, we can define which scripts to run on the homepage and which run on the game page.
We need an API for retrieving the game details by game_id. Let’s set that up in the back-end.
api/game.js:
const mysql = require('../helpers/mysql')
const express = require('express')
const router = express.Router()

router.get('/game/:id', async (req, res) => {
  try {
    const id = req.params.id
    if (!id || id.length !== 20 || !id.match(/^[a-zA-Z0-9]+$/)) {
      return res.json({
        id: 0,
        error: 'Wrong id.'
      })
    }
    const game = await mysql.query(
      'SELECT `game_id`, `player1`, `player2`, `starting_player`, `status`, `winner` FROM `games`' +
        'WHERE `game_id`=?',
      [id]
    )
    if (!game || !Array.isArray(game) || game.length < 1) {
      return res.json({
        id: 1,
        game: []
      })
    }
    return res.json({
      id: 1,
      game
    })
  } catch (e) {
    return res.json({
      id: 0,
      error: 'Unexpected error.'
    })
  }
})

module.exports = router
The above code is similar to the other APIs we set up. Nothing new here. Now we can show the game details on the game.html page.
const getGameDetails = async (id) => {
  const data = await APICall('/game/' + id)
  if (data && data.id === 0) {
    document.getElementById('details-error').innerHTML = data.error
  } else if (data && data.id === 1) {
    const game = data.game[0]
    document.getElementById('game-details').innerHTML = `<tr>
    <td>${game.player1}</td>
    <td>${game.player2}</td>
    <td>${game.starting_player}</td>
    <td>${game.status}</td>
    <td>${game.winner}</td>
    </tr>`
    if (game.player1 === userData.username) {
      document.getElementById('req-message-1').style.display = 'block'
      document.getElementById('req-message-2').style.display = 'none'
    }
  }
}
And running the above function:
const queryString = window.location.search
const urlParams = new URLSearchParams(queryString)

// Run the script only in homepage
if (!window.location.pathname.match(/game.html$/)) {
  loadTheGames()
  setInterval(() => loadTheGames(), 5000)
} else {
  // Run the script only in game page
  if (urlParams.has('id')) {
    getGameDetails(urlParams.get('id'))
  }
}
We get the id from the page URL and use it in the API call. Then display the data in an HTML table.
<table class="table">
  <thead>
    <tr>
      <th>Player1</th>
      <th>Player2</th>
      <th>Starting player</th>
      <th>Status</th>
      <th>Winner</th>
    </tr>
  </thead>
  <tbody id="game-details">
  </tbody>
</table>
We can get the join requests from API and show them beside the game so player1 can accept one of the coming requests and start the game. A simple HTML table:
<table class="table">
  <thead>
    <tr>
      <th>Player</th>
      <th>Status</th>
      <th>Action</th>
    </tr>
  </thead>
  <tbody id="request-list"></tbody>
</table>
And the API call:
const getRequests = async (id, creator = false) => {
  const data = await APICall('/requests/' + id)
  if (data && data.id === 0) {
    document.getElementById('requests-error').innerHTML = data.error
  } else if (data && data.id === 1) {
    let temp = ''
    for (let i = 0; i < data.requests.length; i++) {
      const request = data.requests[i]
      temp += `<tr>
        <td>${request.player}</td>
        <td>${request.status}</td>`
      if (creator) {
        // Add an Accept button if the visitor is player1 (creator)
        temp += `<td>
          <button class="btn btn-primary" onclick="acceptRequest(${id}, ${request.player})">
            Accept
          </button>
        </td>`
      } else {
        temp += '<td>---</td>'
      }
      temp += '</tr>'
    }
    if (data.requests.length < 1) {
      temp = 'None'
    }
    document.getElementById('request-list').innerHTML = temp
  }
}
We can call the getRequests function inside the getGameDetails function because we can know when the user (visitor) is the creator of the game aka player1. Then show them an Accept button based on that so the player1 can accept the request.
const getGameDetails = async (id) => {
  ... // skipped unchanged lines
    if (game.player1 === userData.username) {
      document.getElementById('req-message-1').style.display = 'block'
      document.getElementById('req-message-2').style.display = 'none'
      getRequests(id, true)
    } else {
      getRequests(id, false)
    }
  }
}
Also, let’s make both functions run with an interval to auto-update the data.
// Run the script only in homepage
if (!window.location.pathname.match(/game.html$/)) {
  loadTheGames()
  setInterval(() => loadTheGames(), 5000)
} else {
  // Run the script only in game page
  if (urlParams.has('id')) {
    getGameDetails(urlParams.get('id'))
    setInterval(() => getGameDetails(urlParams.get('id')), 5000)
  }
}
We added the accept button so let’s add its function and transaction too.
const acceptRequest = async (id, player) => {
  const success = document.getElementById('requests-success')
  const error = document.getElementById('requests-error')
  if (!userData.username) {
    return
  }
  try {
    const accept = {
      app: 'tictactoe/0.0.1',
      action: 'accept_request',
      id,
      player
    }
    const operations = [
      [
        'custom_json',
        {
          required_auths: [],
          required_posting_auths: [userData.username],
          id: 'tictactoe',
          json: JSON.stringify(accept)
        }
      ]
    ]
    const tx = new hiveTx.Transaction()
    await tx.create(operations)
    const privateKey = hiveTx.PrivateKey.from(userData.key)
    tx.sign(privateKey)
    const result = await tx.broadcast()
    if (result && result.result && result.result.block_num) {
      success.innerHTML = 'Success! Game started.'
    } else {
      error.innerHTML = 'Error! Check console for details. Press Ctrl+Shift+J'
      console.error(result)
    }
  } catch (e) {
    error.innerHTML = 'Error! Check console for details. Press Ctrl+Shift+J'
    console.error(e)
  }
}
Now let’s add a button for other users to join the game.
<button id="join-btn" class="btn btn-primary" onclick="joinGame()">Join the game</button>
And build the transaction for it:
const joinGame = async (gameId) => {
  const success = document.getElementById('join-success')
  const error = document.getElementById('join-error')
  if (!urlParams.has('id')) {
    return
  }
  const id = urlParams.get('id')
  try {
    const joinReq = {
      app: 'tictactoe/0.0.1',
      action: 'request_join',
      id
    }
    const operations = [
      [
        'custom_json',
        {
          required_auths: [],
          required_posting_auths: [userData.username],
          id: 'tictactoe',
          json: JSON.stringify(joinReq)
        }
      ]
    ]
    const tx = new hiveTx.Transaction()
    await tx.create(operations)
    const privateKey = hiveTx.PrivateKey.from(userData.key)
    tx.sign(privateKey)
    const result = await tx.broadcast()
    if (result && result.result && result.result.block_num) {
      success.innerHTML = 'Success! Your request submitted.'
    } else {
      error.innerHTML = 'Error! Check console for details. Press Ctrl+Shift+J'
      console.error(result)
    }
  } catch (e) {
    error.innerHTML = 'Error! Check console for details. Press Ctrl+Shift+J'
    console.error(e)
  }
}
Next part
We finally finished most of the functions needed for starting the game. I think the only remaining challenge is the gameplay. We can use Canvas for the front-end graphical gameplay. I already built a project with Canvas but there is nothing easy about coding. It’s still a challenge.
Let me list the remaining tasks:
- Gameplay front-end
- Gameplay back-end
- resync method for the database
- Front-end polishing
We are getting to the end of this project and I think we can finish it in the next post and finally play this boring game at least once.
Making tutorials and coding at the same time is really hard and tiring. I might continue writing this kind of series for different projects if there is enough interest but the target audience is too small. So let me know in the comments what you think.
I wouldn’t mind building an interesting app or game which can be some kind of tutorial too.
TBH after writing the above line I wanted to remove it. Let’s see what happens.
Part 6
First of all, thank you for following me and making these posts available for a bigger audience by sharing them.
This post took too long but finally, it’s done. I think I could make 5 posts with the content of just this yet-to-be-written post. I will make it short as possible. I was going to make a few excuses for taking it too long but TBH I could deliver it maybe 2 weeks earlier if I worked on it. Lazy me is for the blame.
The game itself is not important for me, the important part was writing these posts to show how easy it is to make true decentralized applications and games. Of course, it’s not for everybody. But now we have something to share with other developers who want to start a game or app. It’s not perfect but it’s something.
Anyway, it’s online and it’s fully functional. You can try it with a friend on https://tic-tac-toe.mahdiyari.info/. Create a game and the other user can join it. Then the game should start. There is no time limit on the game.
Link to the GitLab repository and the previous posts are at the end of the post. Maybe you can try running your instance of the game for the experiment! It will start syncing blocks and become identical to the official website.
Now moving to the development side of things. I won’t drop all the codes here because it’s massive. All the codes are almost 2,000 lines. I will only explain the parts that seem necessary. ***
Development
We can use pm2 to launch our application. So let’s make a config file for it.
ecosystem.config.js
module.exports = {
  apps: [
    {
      name: 'app-tictactoe',
      script: 'index.js',
      instances: 1,
      max_memory_restart: '1G',
      exec_mode: 'fork'
    },
    {
      name: 'api-tictactoe',
      script: 'api/server.js',
      instances: 2,
      max_memory_restart: '1G',
      exec_mode: 'cluster'
    }
  ]
}
This will launch the API in a cluster mode with 2 instances for better handling of the traffic. You can increase the number of instances up to the number of your CPU threads. ONLY the API. We can’t run the main application in a cluster mode and it’s not necessary at all. We set both scripts to use a maximum of 1GB RAM but in reality, both will use less than 40mb. It’s just to be safe.
I added the necessary scripts in the package.json for running the application.
"scripts": {
    "test": "echo \"Error: no test specified\" && exit 1",
    "start": "pm2 start ecosystem.config.js",
    "stop": "pm2 delete ecosystem.config.js",
    "restart": "pm2 restart ecosystem.config.js",
    "reload": "pm2 reload ecosystem.config.js",
    "logs": "pm2 logs"
  }
For example, for starting the app I can type npm run start and npm run logs for logs and so on. It will use the installed pm2 with the app itself.
For the ability to sync blocks in a row one by one, we use a queue. I call this implementation rapidQueue. It’s in pure JS and is faster than the other methods. You can check it out on GitLab.
I set the genesis block of our game to 53,886,076 just because it was the head block at the time of launch. Every time a fresh instance of the game is installed, it will go through all the blocks one by one from the genesis block until the current head block and continue listening for the future blocks.
So here it is our syncing method:
index.js
const start = async () => {
  try {
    await initDatabase()
    stream.streamBlockNumber(async blockNum => {
      if (!blockNum) {
        return
      }
      if (firstRun) {
        firstRun = false
        await queueOldBlocks(blockNum)
      }
      queue.push(blockNum)
    })
    processQueue()
  } catch (e) {
    throw new Error(e)
  }
}
First, initializes database then puts into the queue not synced blocks, then puts the newly generated blocks into the back of the queue. Then call another function that will check the queue at an interval.
The code below is responsible for putting not synced blocks into the queue.
const queueOldBlocks = async nowBlock => {
  let oldestBlock
  const latestBlock = await mysql.query(
    'SELECT `block_number` FROM `lastblock` WHERE `id`=1'
  )
  if (latestBlock[0].block_number === 0) {
    oldestBlock = genesisBlock
  } else {
    oldestBlock = latestBlock[0].block_number
  }
  if (oldestBlock < nowBlock) {
    for (let i = oldestBlock; i < nowBlock; i++) {
      queue.push(i)
    }
  }
}
The following code is the part that takes block numbers one by one out of the queue. It runs every 5ms to check if the current block is processed or not. If yes, goes to the next block in the queue. queueIndex is the counter of the currently running processBlock()s. Which will be a maximum of 1.
const intervalTime = 5
const maxI = 1
let queueIndex = 0
const processQueue = () => {
  setInterval(() => {
    const L = queue.length()
    if (queueIndex < maxI && L > 0) {
      const n = maxI - queueIndex > L ? L : maxI - queueIndex
      for (let k = 0; k < n; k++) {
        const blockNum = queue.shift()
        processBlock(blockNum)
      }
    }
  }, intervalTime)
}
You can see the counter in action:
const processBlock = async blockNum => {
  if (!blockNum) {
    return
  }
  queueIndex++
  try {
    const operations = await stream.getOperations(blockNum)
    if (operations && operations.length > 0) {
      for (const ops of operations) {
        for (const op of ops) {
          if (op && op[0] === 'custom_json' && op[1].id === 'tictactoe') {
            await processData(op[1].json, op[1].required_posting_auths)
          }
        }
      }
    }
    await updateLastblock(blockNum)
    totalSyncedBlocks++
  } catch (e) {}
  queueIndex--
}
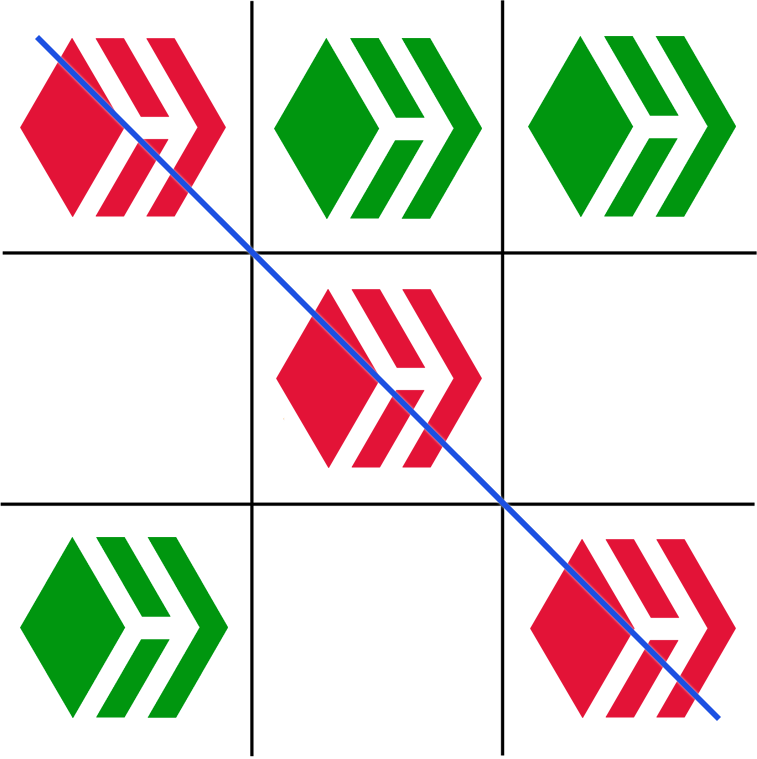
The heart of the game is the play function. It determines the finished games and winners. It is triggered when a player plays a move.
const play = async (data, user) => {
  if (
    !data ||
    !data.id ||
    !data.col ||
    !data.row ||
    isNaN(data.col) ||
    isNaN(data.row) ||
    data.id.length !== 20 ||
    data.col < 1 ||
    data.col > 3 ||
    data.row < 1 ||
    data.row > 3
  ) {
    return
  }
  // Validate game in database
  const game = await mysql.query(
    'SELECT `player1`, `player2`, `starting_player` FROM `games` WHERE `game_id`= ? AND `status`= ? AND (player1=? OR player2=?)',
    [data.id, 'running', user, user]
  )
  if (!game || !Array.isArray(game) || game.length < 1) {
    return
  }
  // Validate the player round
  let round = ''
  const computedMoves = new Array(9)
  const moves = await mysql.query(
    'SELECT `player`, `col`, `row` FROM `moves` WHERE `game_id`= ? ORDER BY `id` ASC',
    [data.id]
  )
  if (!moves || !Array.isArray(moves) || moves.length < 1) {
    round = game[0].starting_player
  } else {
    if (moves[moves.length - 1].player === game[0].player1) {
      round = 'second'
    } else {
      round = 'first'
    }
  }
  if (moves.length > 8) {
    return
  }
  if (round === 'first' && game[0].player2 === user) {
    return
  }
  if (round === 'second' && game[0].player1 === user) {
    return
  }
  // Play game and check winner
  await mysql.query(
    'INSERT INTO `moves`(`game_id`, `player`, `col`, `row`) VALUES (?,?,?,?)',
    [data.id, user, data.col, data.row]
  )
  moves.push({ player: user, col: data.col, row: data.row })
  for (let i = 0; i < moves.length; i++) {
    const move = moves[i]
    let mark
    if (move.player === game[0].player1) {
      mark = 'x'
    } else if (move.player === game[0].player2) {
      mark = 'o'
    } else {
      continue
    }
    if (move.row === 1) {
      computedMoves[move.col - 1] = mark
    } else if (move.row === 2) {
      computedMoves[move.col + 2] = mark
    } else if (move.row === 3) {
      computedMoves[move.col + 5] = mark
    }
  }
  checkWinner(computedMoves, data.id)
}
The play function validates the data, then places the played move, then checks for the game status for a possible winner or draw.
The checkWinner function:
const checkWinner = async (computedMoves, id) => {
  if (checkWinningMark(computedMoves, 'x')) {
    await mysql.query(
      'UPDATE `games` SET `status`=?, `winner`=? WHERE `game_id`=?',
      ['finished', 'player1', id]
    )
  } else if (checkWinningMark(computedMoves, 'o')) {
    await mysql.query(
      'UPDATE `games` SET `status`=?, `winner`=? WHERE `game_id`=?',
      ['finished', 'player2', id]
    )
  } else {
    for (let i = 0; i < 9; i++) {
      if (!computedMoves[i]) {
        return
      }
    }
    await mysql.query(
      'UPDATE `games` SET `status`=?, `winner`=? WHERE `game_id`=?',
      ['finished', 'none', id]
    )
  }
}
It checks for the winning of player1 or “X” and then player2 or “O” then checks for the filled board for a draw. Then the database is updated.
checkWinningMark() is not interesting. It just checks each row and col for a winning pattern for the provided mark. X or O.
At the end of the file, we call the start() method to start the application. Then inform the user current state of sync.
start()
console.log('Tic Tac Toe Application')
console.log(
  'Starting application... It is highly recommended to use a local node for syncing blocks otherwise it might take too long.'
)
const interval = setInterval(() => {
  if (queue.length() < 2) {
    clearInterval(interval)
    console.log('Sync completed. Application is running.')
  } else {
    console.log('Syncing blocks... Total synced blocks: ' + totalSyncedBlocks)
  }
}, 5000)
With a local node, it syncs ~70 blocks per second (depends on many things). It can be boosted in certain ways but it’s not necessary for this project. 70 blocks/s is still impressive enough. It all depends on the latency of the connected RPC node because the syncing is done by selecting blocks in a row one by one and waiting for the one to finish before going to the next one.
Client-side
There are many things on the client-side. I’m not going near front-end codes. You can always check the full code on the GitLab repository.
Our game board is designed with Canvas. I don’t think it’s necessary to talk about those codes.
Here is the function for broadcasting a move.
js/app.js
const submitMove = async () => {
  if (!userData.authorized) {
    document.getElementById('login-button').click()
    return
  }
  if (!userMove || userMove.length < 2) {
    return
  }
  if (!urlParams.has('id')) {
    return
  }
  const error = document.getElementById('submit-move-error')
  error.innerHTML = ''
  loading(true)
  const id = urlParams.get('id')
  try {
    const play = {
      app: 'tictactoe/0.0.1',
      action: 'play',
      id,
      col: userMove[0],
      row: userMove[1]
    }
    const operations = [
      [
        'custom_json',
        {
          required_auths: [],
          required_posting_auths: [userData.username],
          id: 'tictactoe',
          json: JSON.stringify(play)
        }
      ]
    ]
    const tx = new hiveTx.Transaction()
    await tx.create(operations)
    const privateKey = hiveTx.PrivateKey.from(userData.key)
    tx.sign(privateKey)
    const result = await tx.broadcastNoResult()
    if (result && result.result && result.result.tx_id) {
      setTimeout(() => getGameDetails(urlParams.get('id')), 1500)
      oldRound = round
      round = round === 'first' ? 'second' : 'first'
      toggleMoveInteractions('player-waiting')
    } else {
      error.innerHTML = 'Error! Check console for details. Press Ctrl+Shift+J'
      console.error(result)
    }
  } catch (e) {
    error.innerHTML = 'Error! Check console for details. Press Ctrl+Shift+J'
    console.error(e)
  }
  loading(false)
}
It creates a transaction with custom_json and uses .broadcastNoResult() method of hiveTx library for the fastest possible transaction broadcast. This method doesn’t return the result of the transaction (but it returns the offline generated tx_id so it’s possible to check for the status of the transaction later but we don’t) so it may as well fail for many reasons but we assume everything is fine. In this way, the user experience is better and smoother. Because the action goes faster.
On the game page, the application gets the game details every 5s from the API and updates the user interface. Then calls the following function to update the board with new moves and also detects the round of play.
const computeMoves = () => {
  if (!movesData || !gameData) {
    setTimeout(() => computeMoves(), 100)
    return
  }
  clearMoves()
  for (let i = 0; i < movesData.length; i++) {
    const move = movesData[i]
    let mark
    if (move.player === gameData.player1) {
      mark = 'x'
    } else if (move.player === gameData.player2) {
      mark = 'o'
    } else {
      continue
    }
    placeMark(move.col, move.row, mark)
  }
  placeMark(userMove[0], userMove[1], userMove[2])
  if (movesData.length < 1) {
    round = gameData.starting_player
  } else if (movesData[movesData.length - 1].player === gameData.player1) {
    round = 'second'
  } else {
    round = 'first'
  }
}
There are many other front-end and back-end stuff which I skip the explanation because it’s not a post about teaching development in any sense. I just explained the things I thought might be necessary for running the Hive applications.
All the codes used in this project are original. Except the rapidQueue method (MIT license).
The final project:
Original posts: